
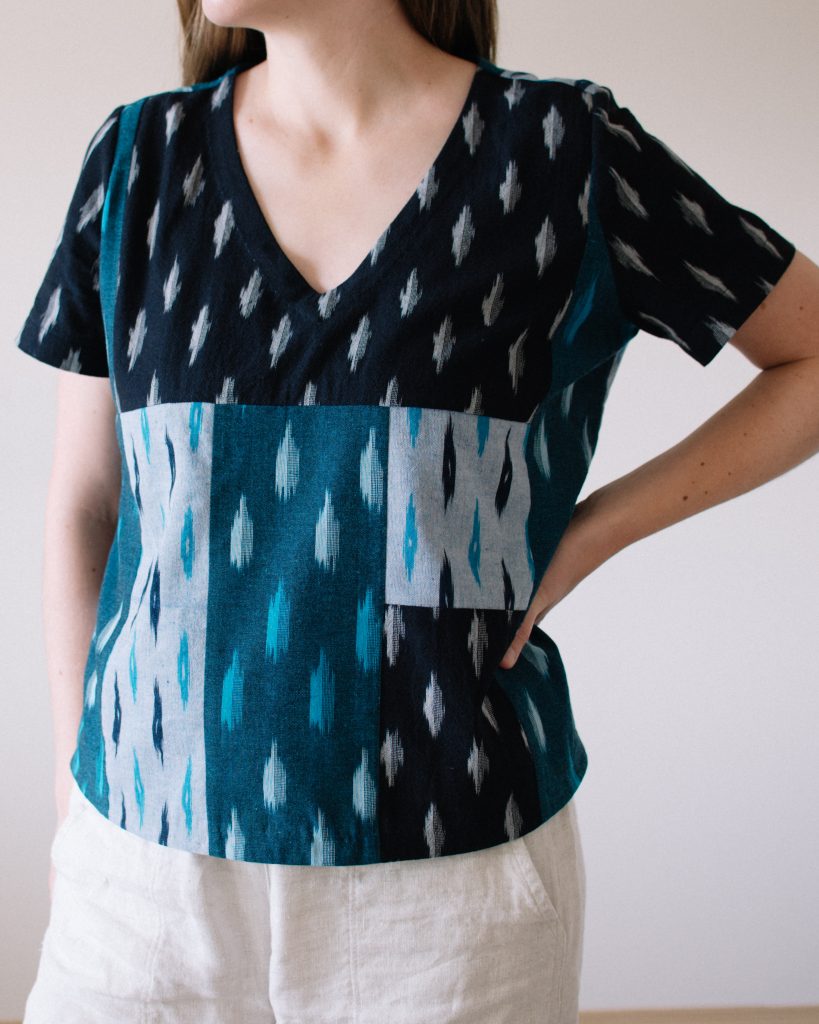
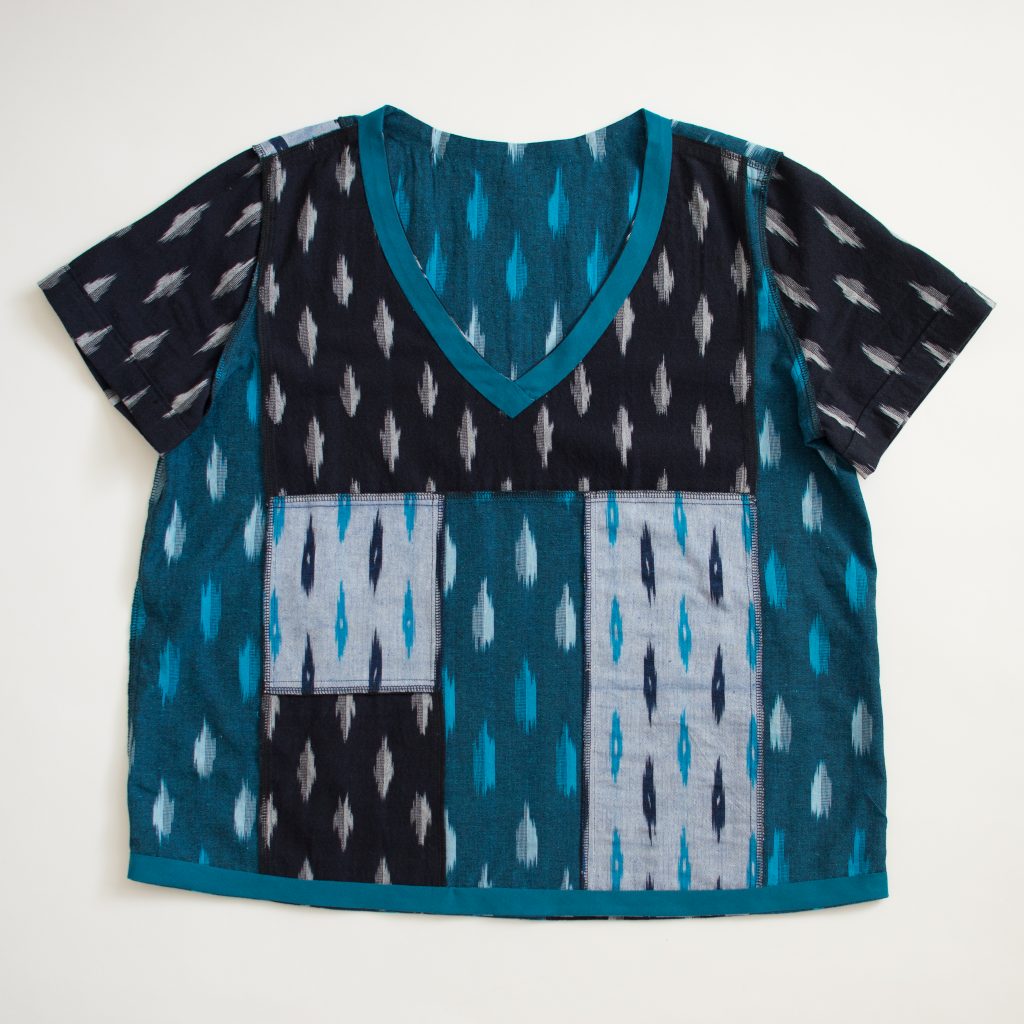
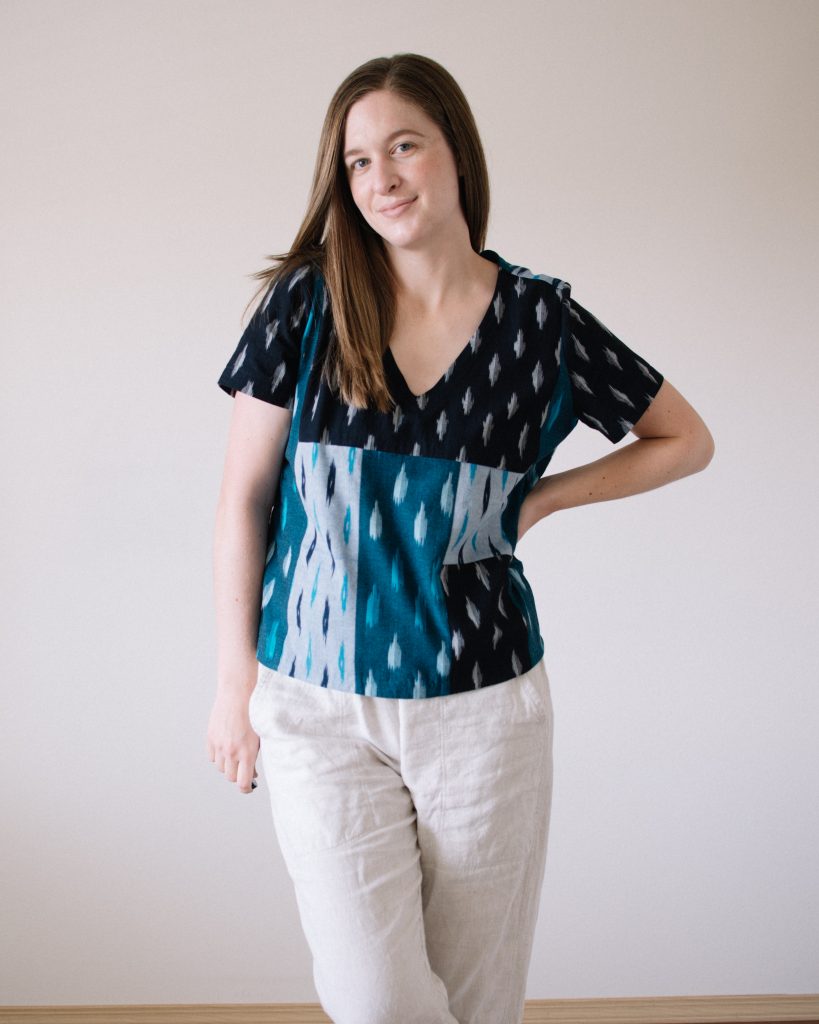
While I was going through my scraps a few months ago, I realized that a few of my ikat fabrics went really well together! I love this fabric way too much to just throw it into a scrap bin, and after seeing other sewists making scrappy tops, I knew I had to make one.
I committed to it a week or so ago and typed ‘scrap busting shirt’ into a search, and I immediately found Elbe Textiles’ blog post, which has a tutorial of patchwork clothing. It was so helpful and almost exactly what I ended up doing! The only step that I skipped in the tutorial was tracing and stitching around the pattern before cutting. I sewed and serged all of my pieces together and it felt pretty solid, so I didn’t feel the need to stitch around the pieces again.
A little overview of what I did — I laid everything out on the kitchen table and organized the scraps the way that I wanted them to come together first. (And laid my pattern piece on top to make sure it was a large enough canvas.) Then I took a picture and numbered the seams in the order that I needed to sew them in. I’m not a quilter, so it took some brainpower, but I did it! Here are the photos I shared on Instagram which I actually used when I went to sew the pieces together.
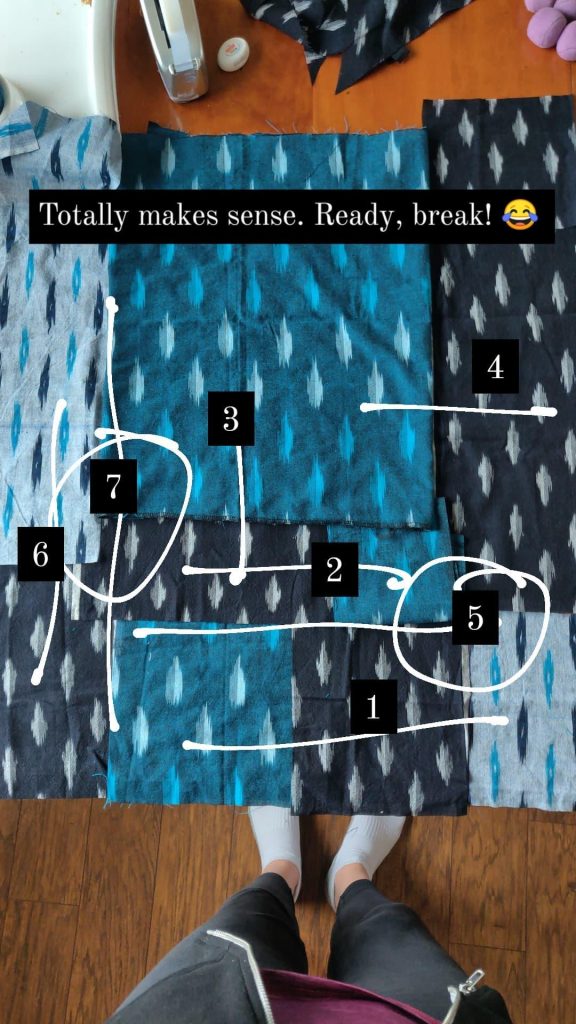
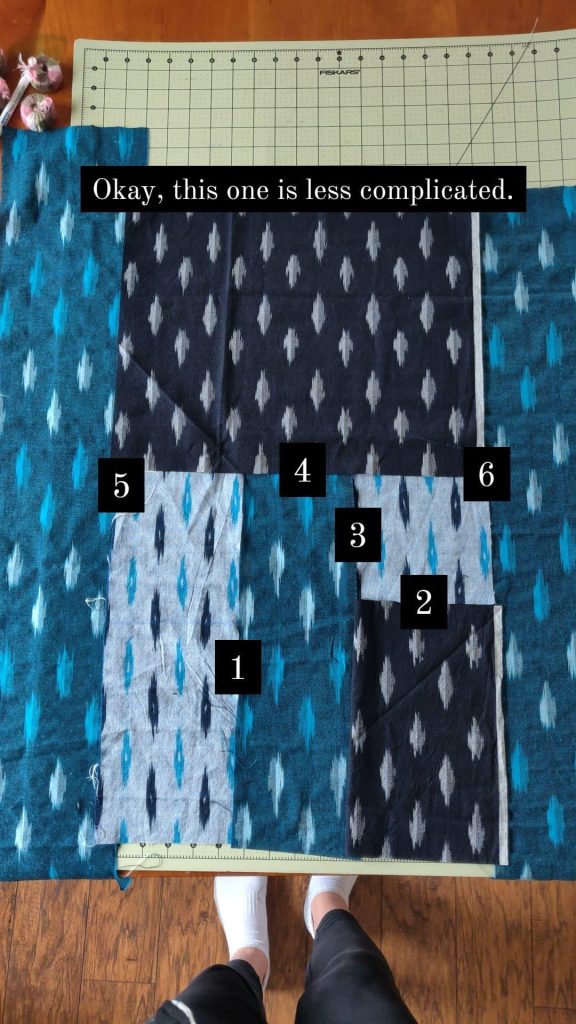
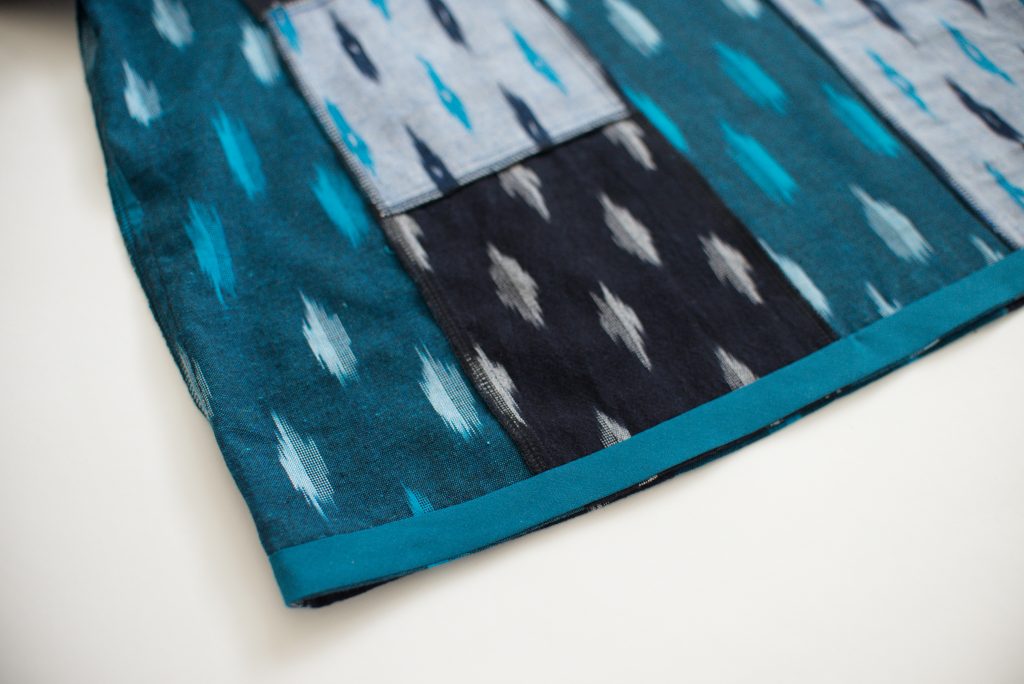
I used a 1/2″ seam allowance to sew all of the seams, and then went over the seams with the serger (without cutting any fabric off while I serged). Then I pressed the seams from both sides really well. It was super easy once I had everything sewn and pressed, because then I could just cut out the shirt pieces and get sewing!
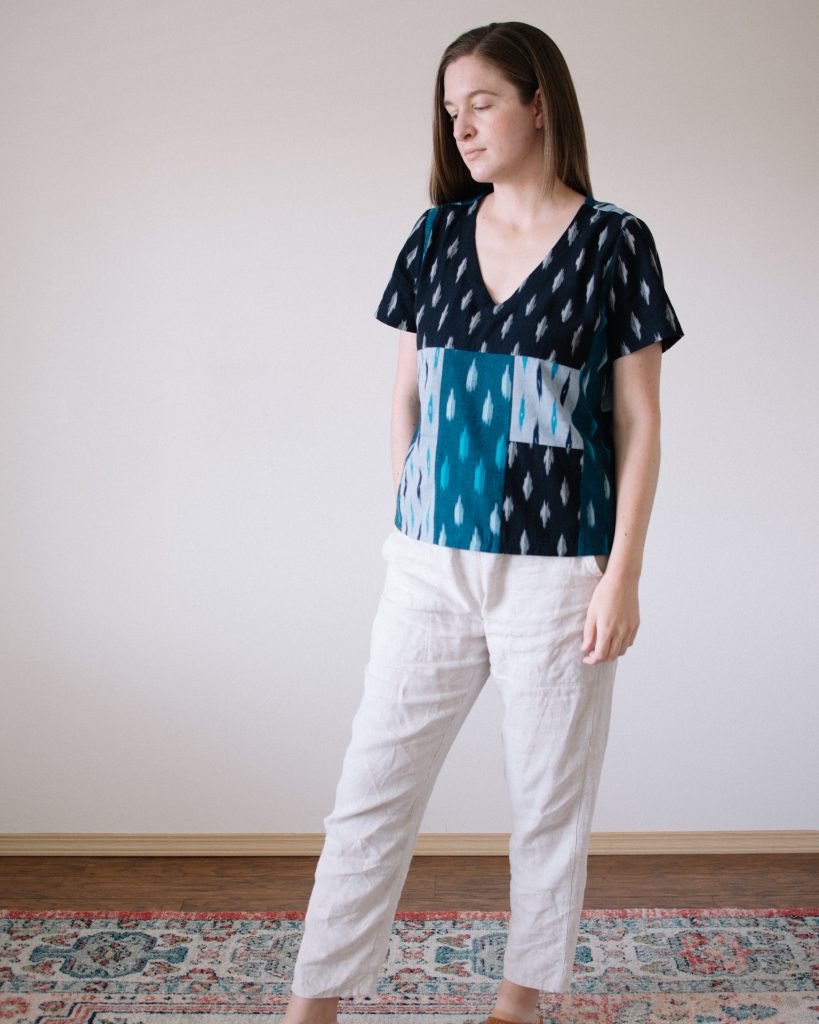
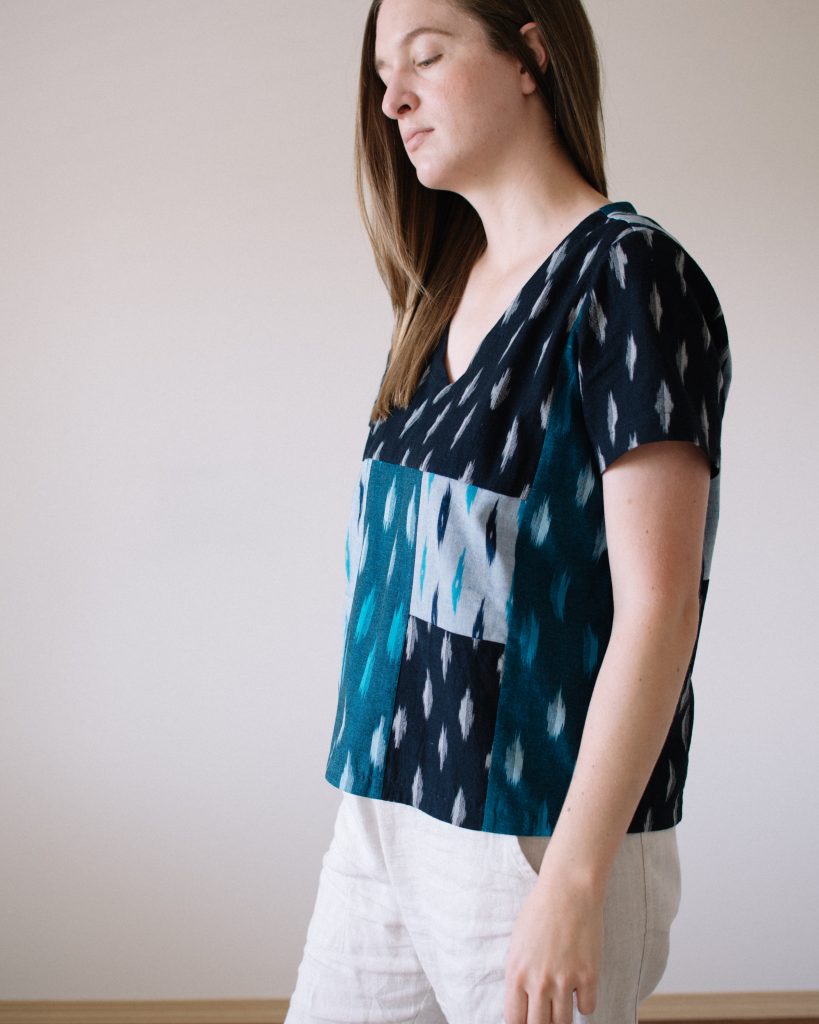
The pattern I used the Key Largo Top from Hey June (sizes up to 44.5″ high bust & 50″ hip). This is a great woven top pattern with so many options. For this shirt, I cut on the straight grain instead of on the bias like the pattern instructs. I also didn’t do a center front seam, so I just folded that part of the pattern over before cutting. Then I made a v in the neckline by drawing a point 3 3/8″ below the pattern’s neckline and used my sewing curve to make a line curving back up to the original neckline (so that I didn’t mess with the width of the shoulders). You could easily do the neckline higher or lower depending on your preference.
I lengthened this pattern by 2″ and made the size 14 which is about a size up from what I could have made. I’m still kind of playing with the sizing of this pattern, so definitely make a muslin before you cut into precious fabric. This size feels good on me though, because I don’t have any tightness happening in the back or shoulders, and I wasn’t having to adjust it throughout the day.
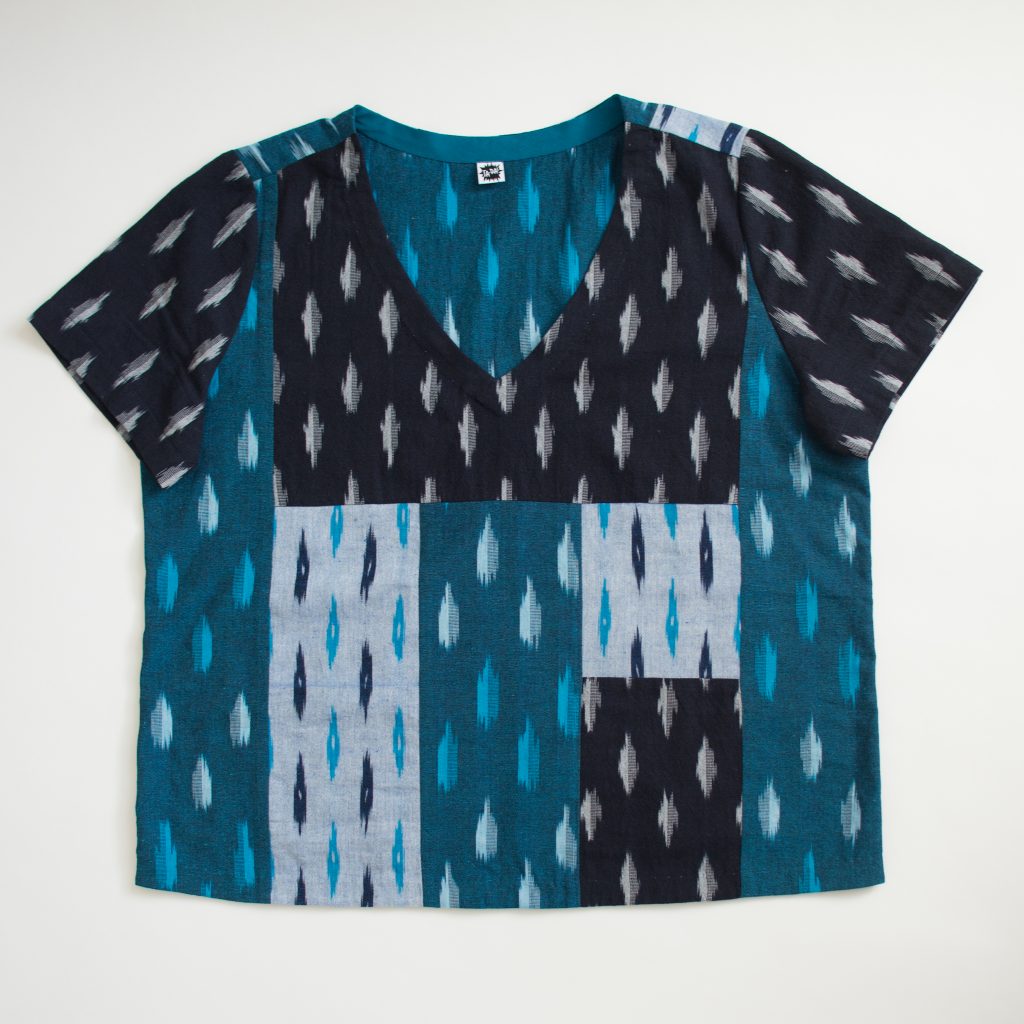
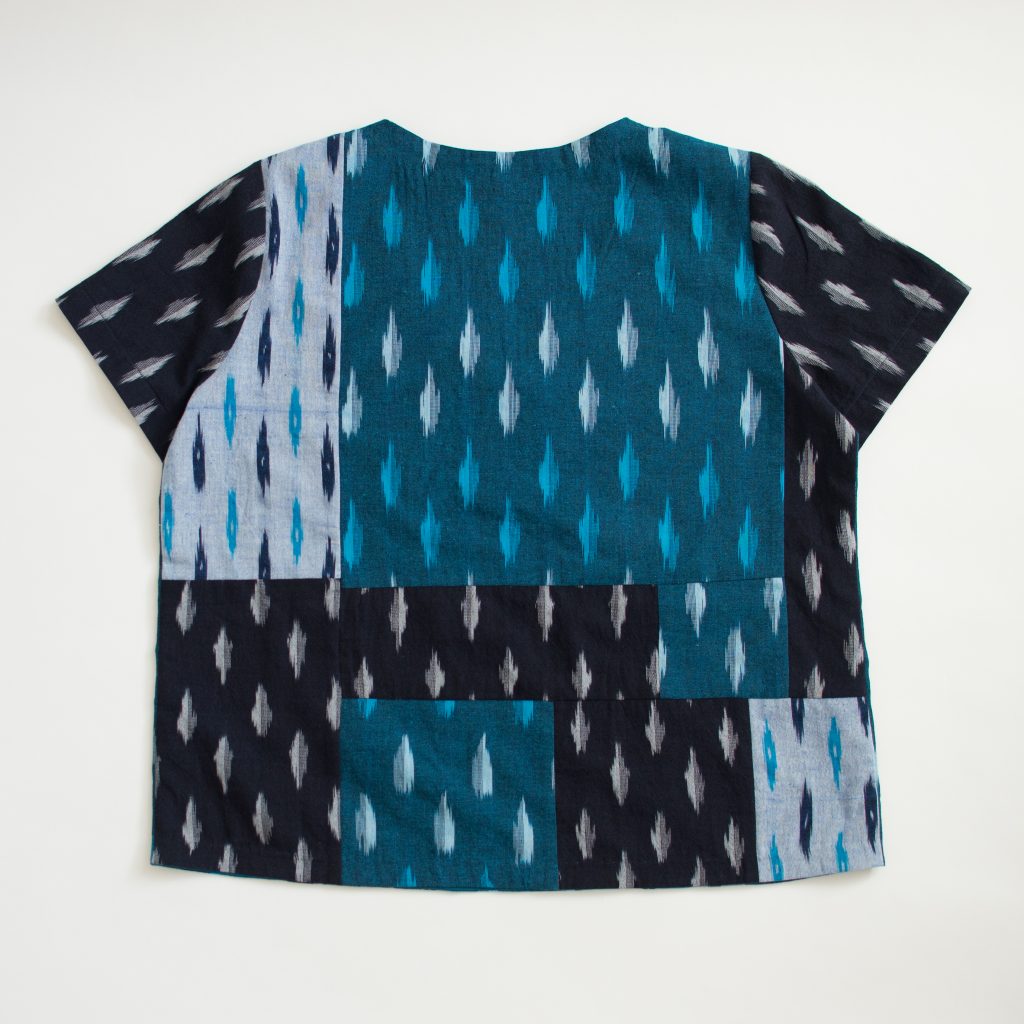
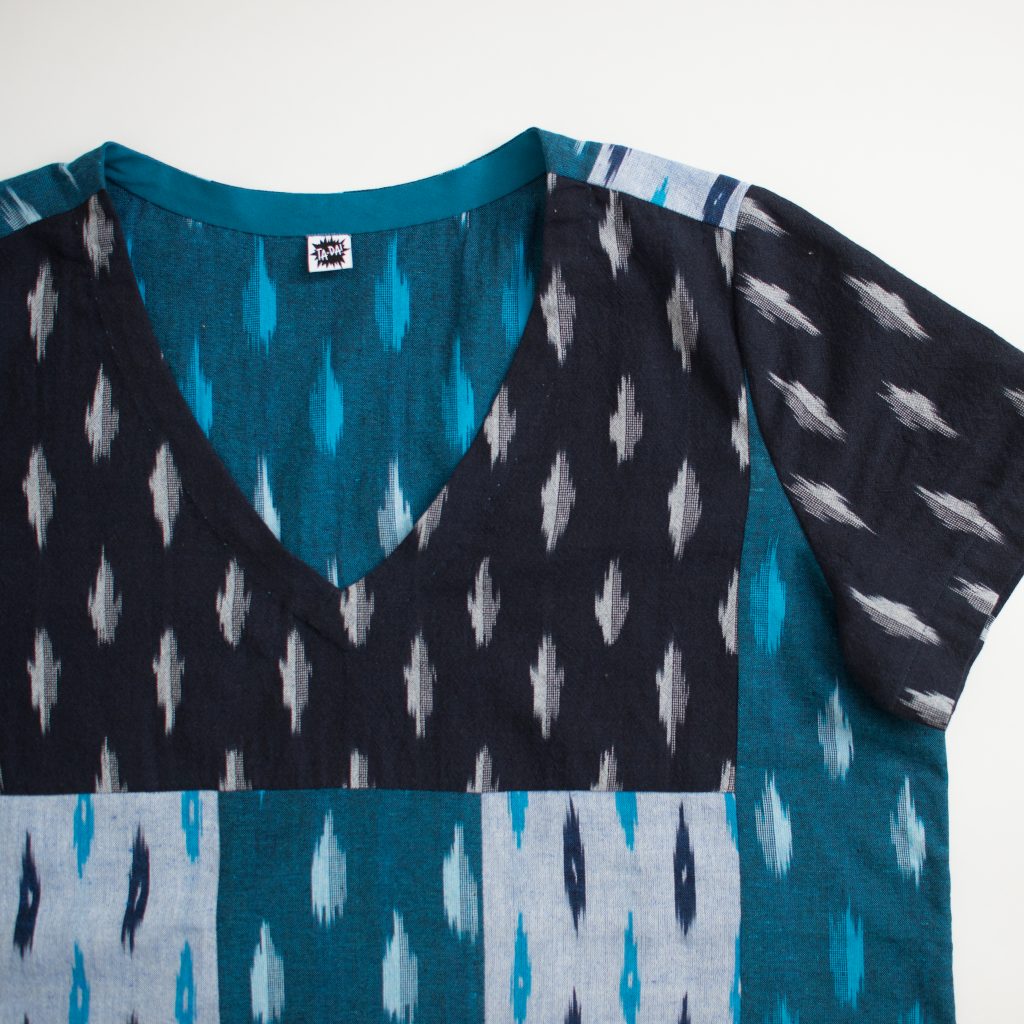
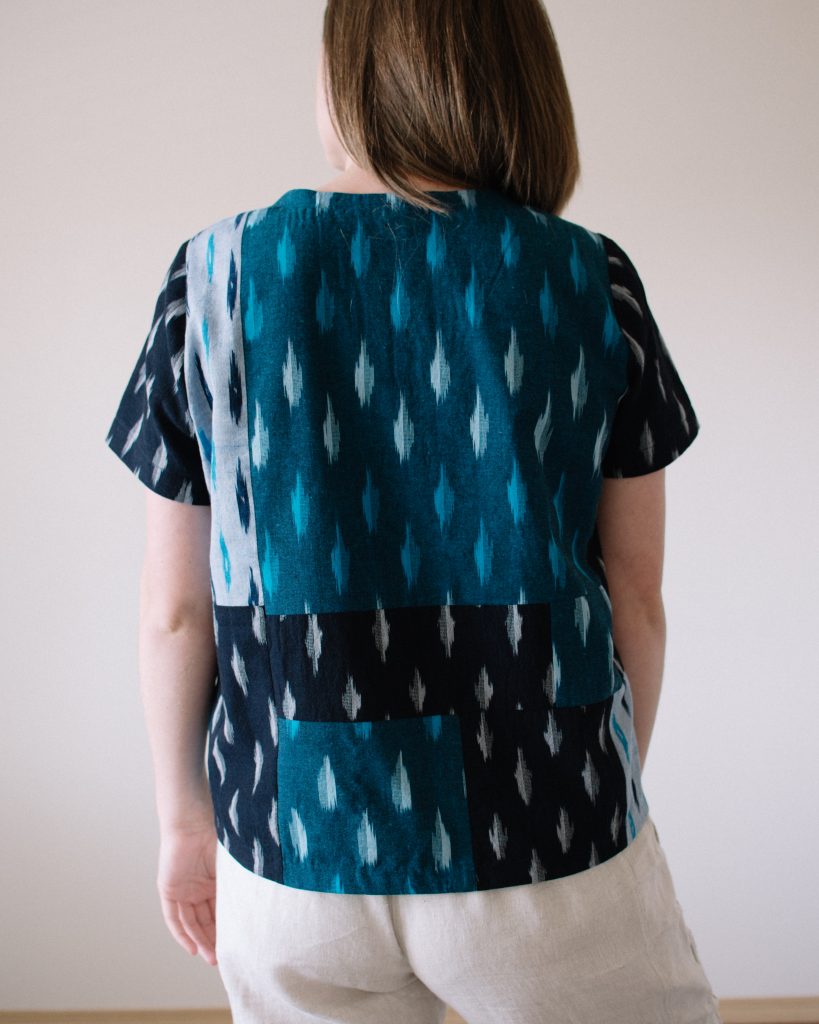
Here are the flat photos so you can see the details a little better. (From left to right, top to bottom: front right side, back right side, front wrong side, front right side close up.)
I decided that since I was using scraps of fabric, I wanted to make sure I had really solid bias binding and wanted it to be continuous. I got this organic cotton bias tape from Style Maker Fabrics, and it is amazing! It is so nice and light weight which worked so well with this fabric. It was really easy to use, and I love the way that it looks on this top!
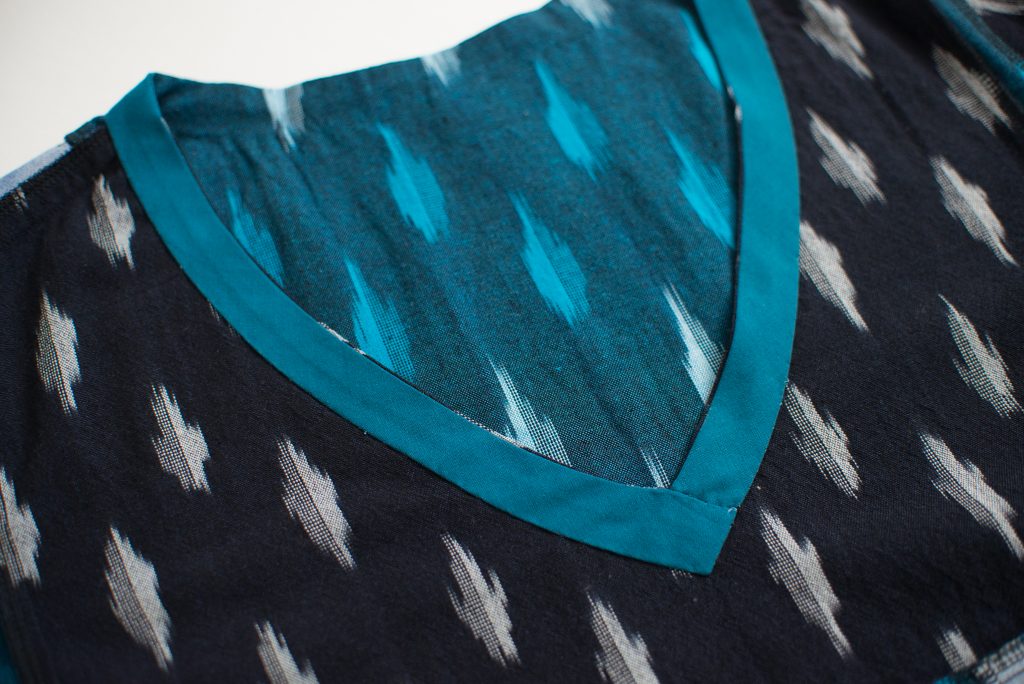
I used Wendy Ward’s AWESOME tutorial on how to apply bias binding to a v-neck and also made sure to press my neckline binding in a curve to make sure it went on nicely (a tip I learned from @winmichele). After sewing the binding on with my machine and ironing it in place, I used Wonder Tape (my holy grail) to stick the binding down so that I could hand-stitch the rest without it moving around.
This was my first time hand-stitching a neckline and hem (I know, total shocker. I’ve been a very impatient sewist in the past), and I watched a video on Youtube to get a little refresher on how to slip stitch. I think it looks pretty good, and it held up super well when I put it in the washer to get the Wonder Tape out.
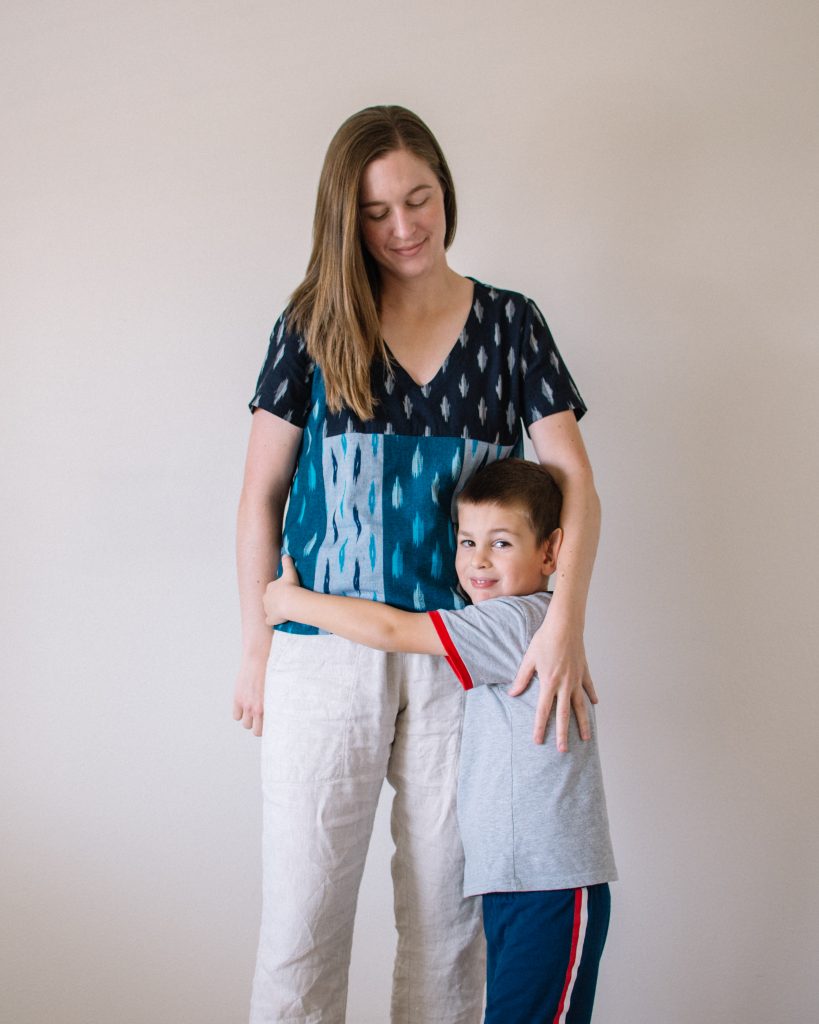
I’m SO happy with how this top turned out, and I’m honestly thinking about making another with more of my ikat scraps. I’m still convinced that I couldn’t be a quilter, but this small scale project was really fun and I was surprised at how much I actually enjoyed it! (Bonus photo above of Braden when he said he needed to come hug me in one of my pictures.)
If you’re on Instagram, Sew Over 50 is doing a sustainable sewing challenge this month, and there’s going to be a scraptember challenge put on by @whipstitchhandmade next month! So it’s a good time to get inspired and pull out your own scraps to make something fun.
Let me know if you have any questions, and happy scrap busting!
This post contains affiliate links. For more information see our Affiliate Links disclosure.
A beautiful scrap busting top. Very well done. Your little sweetheart is adorable as well.
Thank you, Kristi! I’ve already worn it a couple times and I can tell it’s going to be well loved.
That looks beautiful!! Your ikat scraps go together perfectly. I also love making pieced garments and this one is a great example. So glad my v neck binding tutorial was helpful, you’ve made a great job of it.
Thank you, Wendy!! I definitely see more pieced garments in my future. This is the second time I’ve used your tutorial and it is extremely helpful.
I love this! So cute and so well put together. Not sure if you planned on having the darker fabric end where it did on the bustline, but it seems to me to be at a perfect point for the transition. Enjoy wearing it, I’m jealous I don’t have enough ikat to mimic your creation!
Thank you, Carmil! I actually did kind of notice that when I was deciding where to place the pattern before I cut the fabric, and it worked out really well! I’ve already tried to plan another pieced together shirt because this one was so much fun.
Photo bombers who need hugs can’t be beat. Enjoy your glorious shirt!
I just loved the photo so much that I couldn’t leave it out! 🙂 Thank you, Lodi!