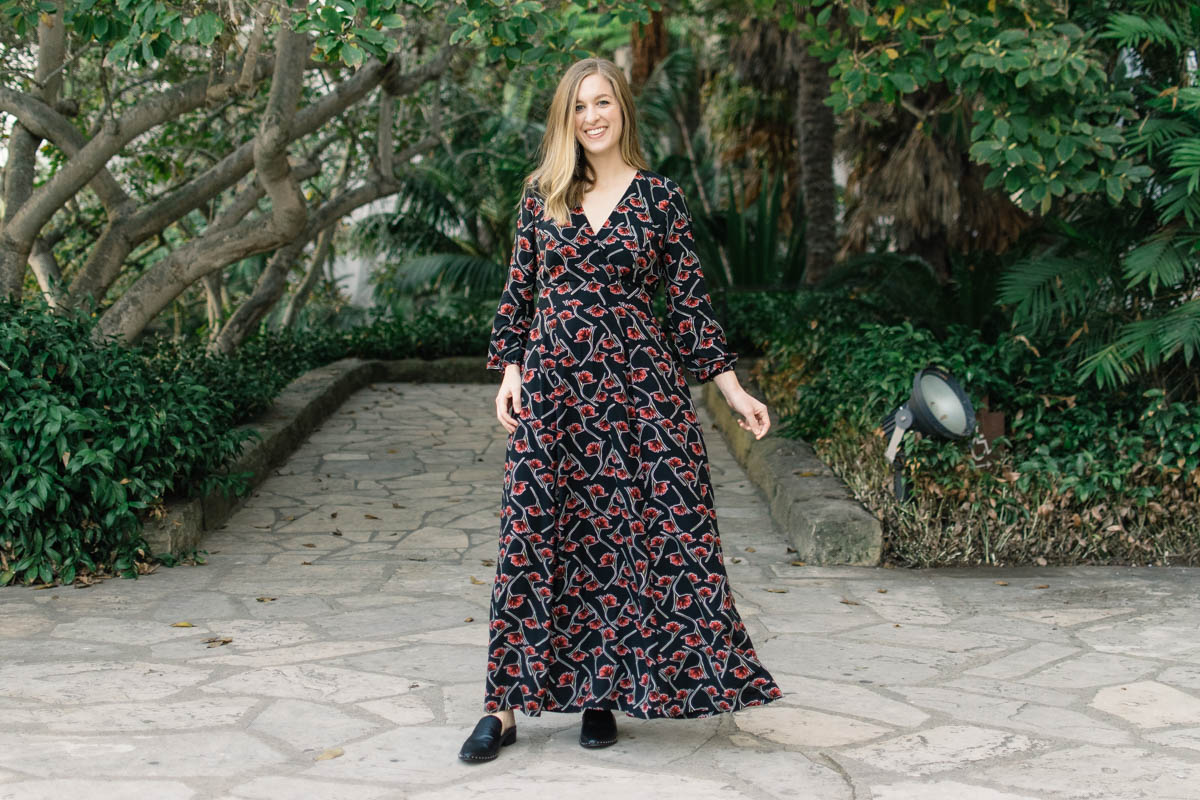
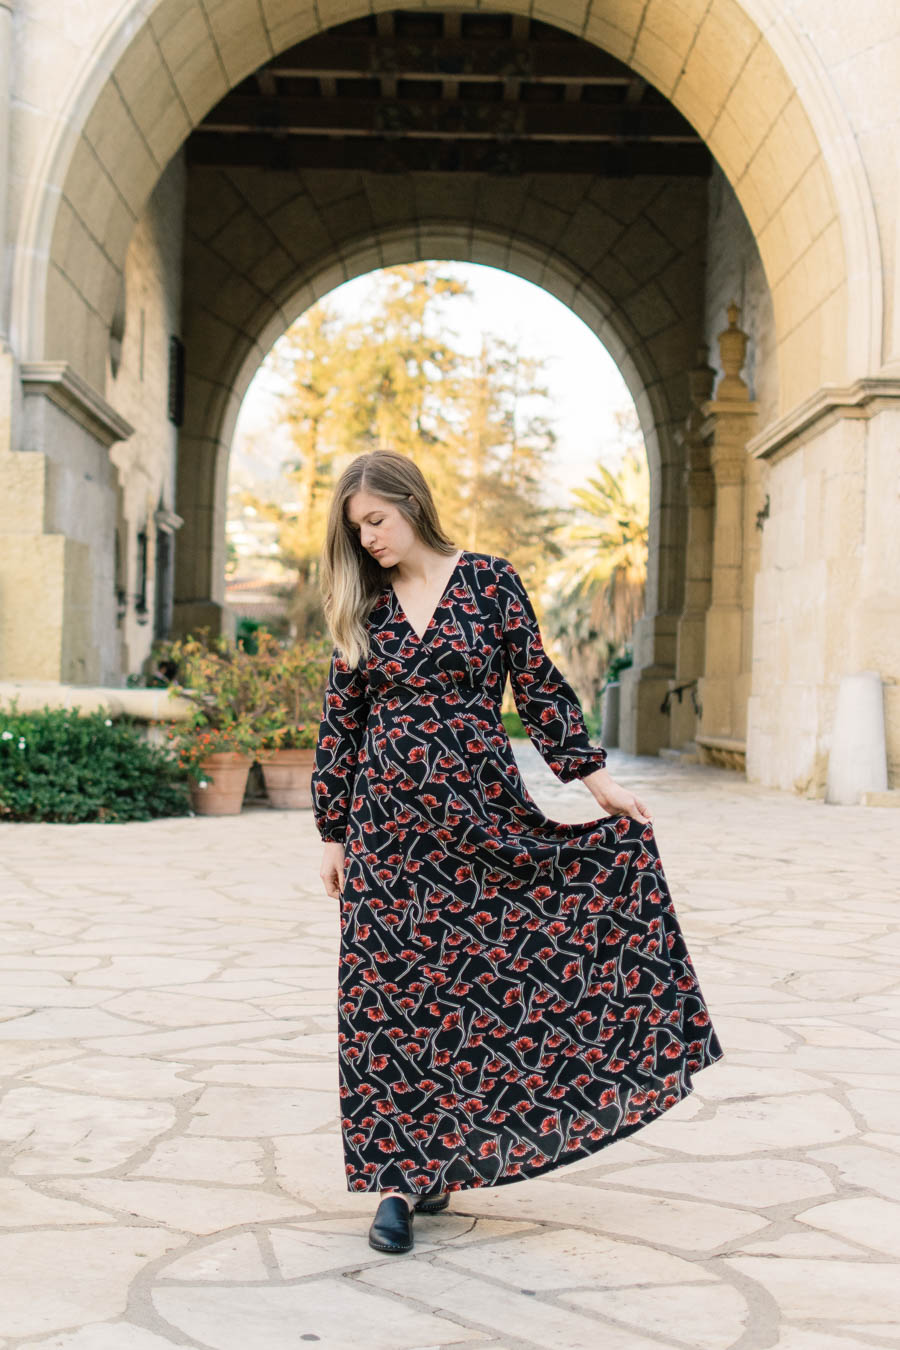
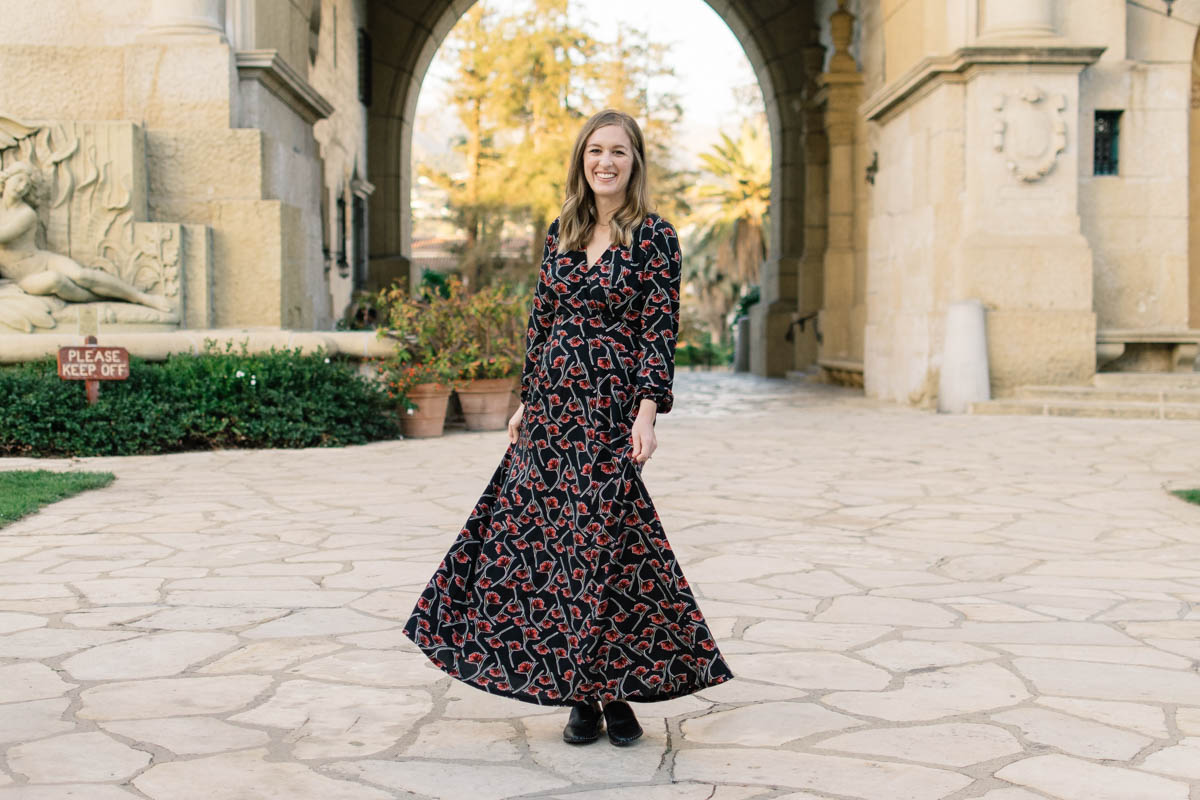
 If you can’t already tell — I LOVE this dress! I made a dress really similar to this one last fall (McCalls 7534), and I’m not sure if people were huge fans of it. It might have been because the fabric I chose was pretty bright, but that’s okay, because I STILL love that dress! I was excited to make the Deer and Doe Magnolia, and after my Highlands Wrap Dress from last year, I was dying to make another maxi dress.
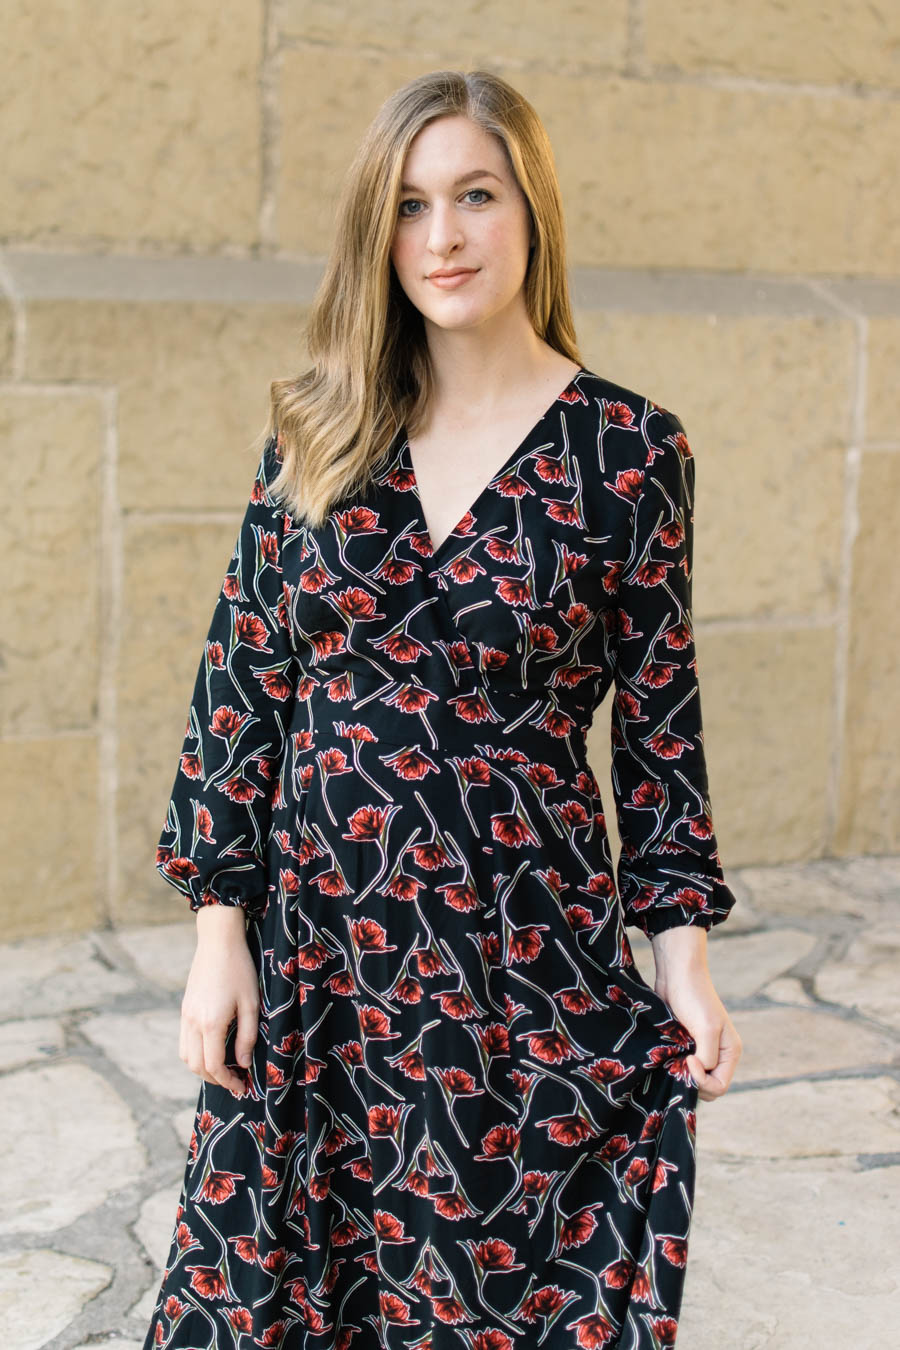
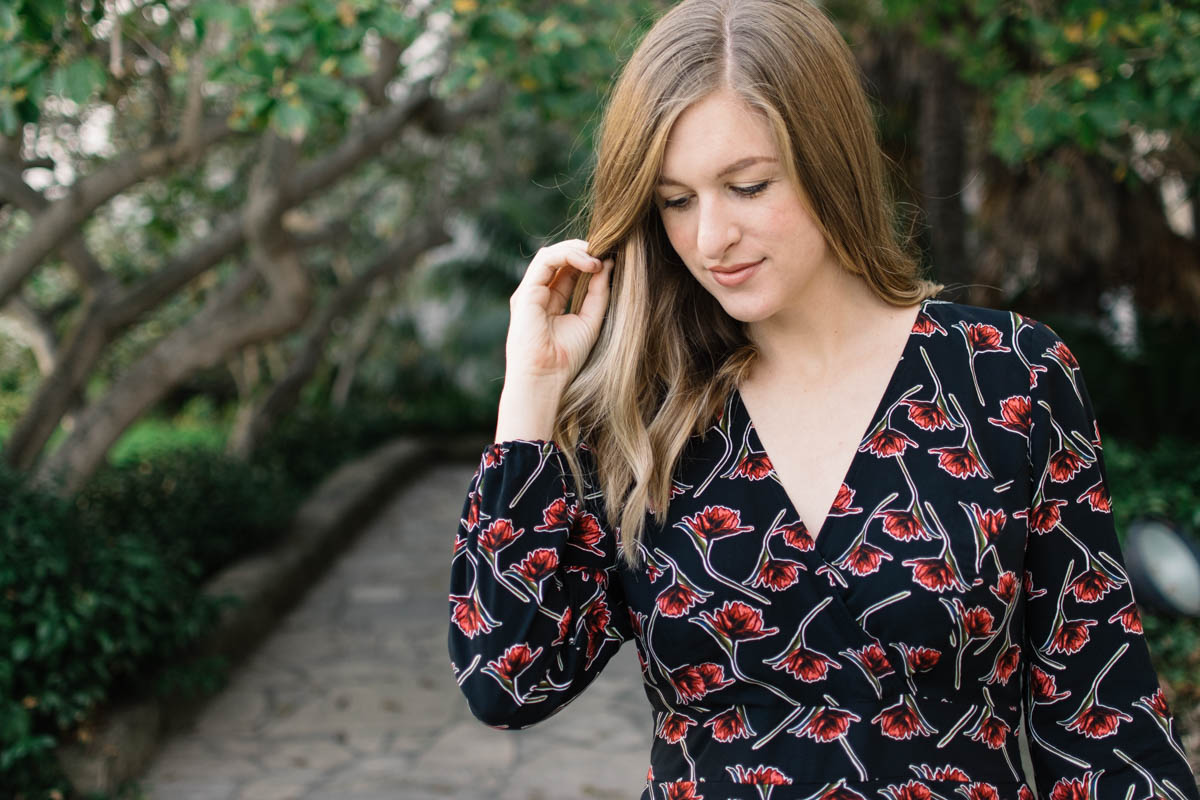
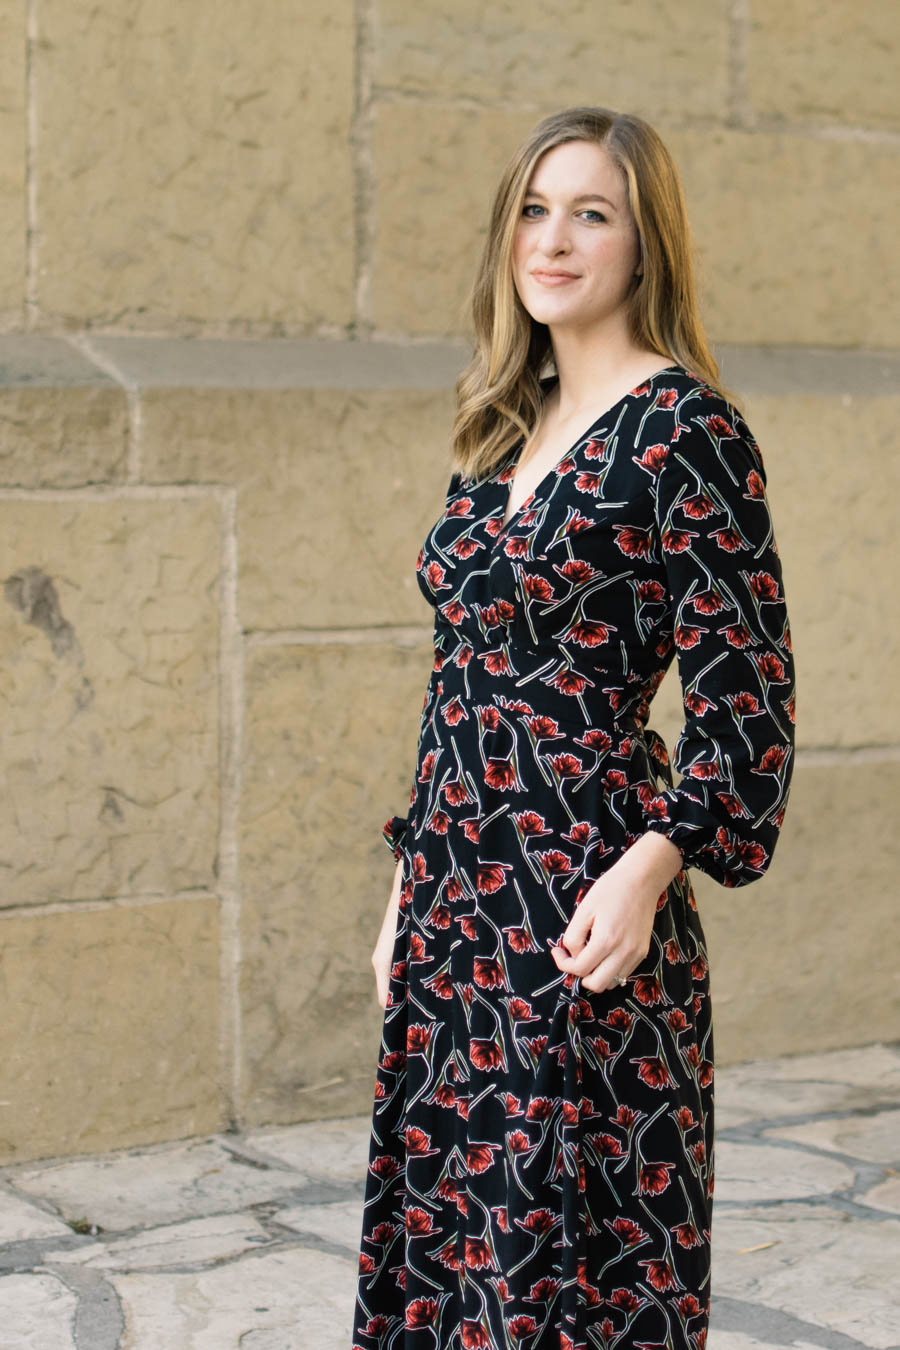
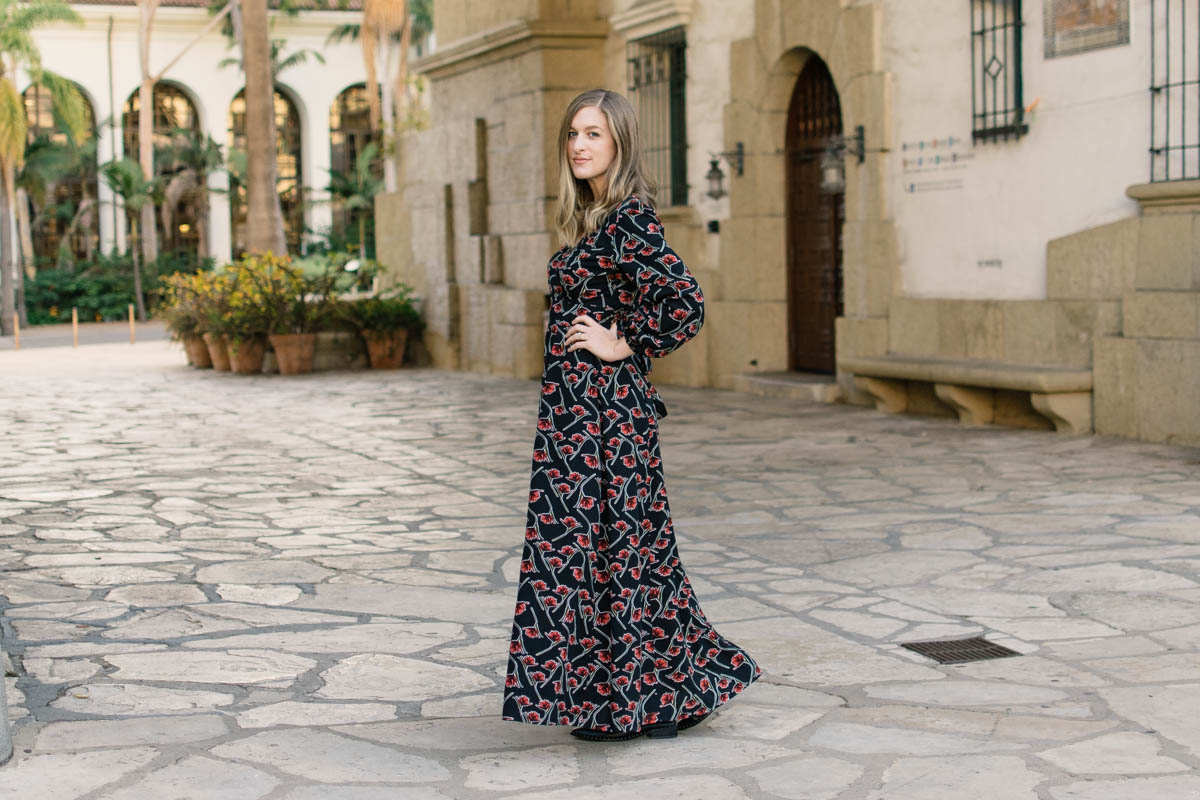 Maxi dresses just make you feel like a freaking QUEEN, right? Especially this one. I was a little bit worried about the neckline, and I know a lot of other people are too because I had quite a few people message me and comments about the neckline. To be honest, it’s like medium low. I made view B which has the neck pieces overlap a few more inches in front for more coverage. You could easily adjust the pattern to cross over further, and the neckline just has binding, so you wouldn’t even have to adjust a facing piece! #win. I might add a snap or wear a black camisole under mine, but it’s not uncomfortably low and it doesn’t gape AT ALL.
I also had a question about the dress being maternity friendly and my answer is YES! It’s empire waist style is perfect for a baby bump, and you can easily make the waistband more narrow to give more room for your belly. Now I need to see a glorious pregnant woman in this dress (and it’s not going to be me for a while). However, I would not categorize it as nursing friendly because it’s a woven fabric pattern, and the binding makes it very difficult to open while wearing it.
 This was my first time making a Deer and Doe pattern, and I am happy to say that it won’t be my last! Deer and Doe has very clean and simple design, and their illustrations are very helpful. There were a few things that stumped me while making this dress, so hopefully me telling you them will save you some brainpower while making yours!
First, it’s not explained anywhere that view A has lined front bodice pieces. Because I was making view A with view B’s neckline, I followed the cutting layout for view A, and it has you cut 4 of the front bodice pieces instead of just 2. I still cut the 4 pieces like it said to, but I had the lining pieces leftover because my fabric was opaque enough to not need it. I do wish it was stated in the pattern description or in the cut layout, though.
Second, you are supposed to stay stitch the front bodice pieces, but it doesn’t say what seam allowance to stay stitch with. If you skip ahead a few steps, you read that you are supposed to sew the binding on with a 3/8 SA (as opposed to the 5/8 SA for the rest of the dress), so I just stay stitched a little less than that so that the stitching wouldn’t show after I sewed my binding on.
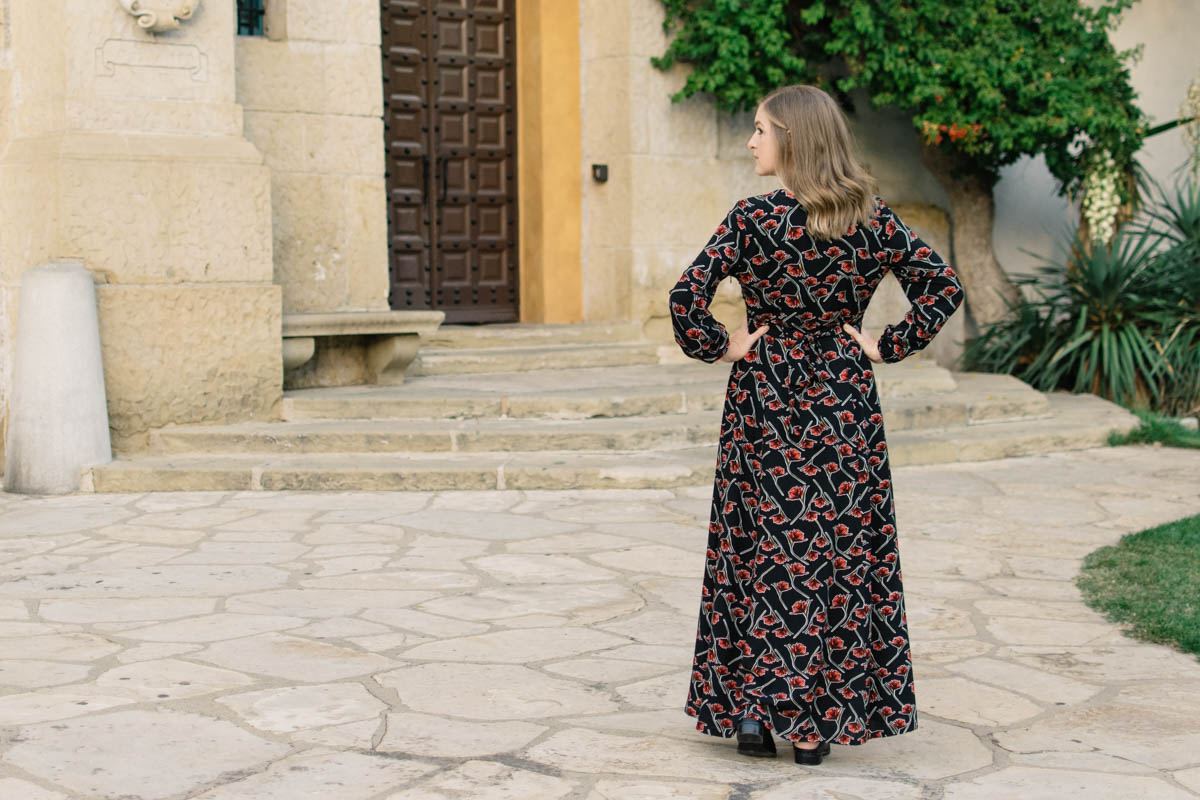
Third, is that I didn’t realize the skirt was 6 pieces instead of 4. In the photos, it looks like there is a front and back panel, and 2 side panels, but really there are 3 in back and 3 in front. So just make sure you keep all of your pieces separated and that you pay attention to that when you are sewing the skirt panels together.
 I did like that the pattern had 5/8 seam allowances, and I had contemplated doing french seams, but I was kind of in a hurry to get it done, and with it being a maxi, sewing the loooooong french seams might have made me loose my mind. Lol. So I chose to sew the seams and finish with my serger.
The only thing I kind of struggled with was the bottom of the invisible zipper. Does anyone else totally struggle to get the bottom of invisible zippers stitched down?? I really need to just google how to do it, but for now it looks okay. The fabric is busy enough that you can’t tell, but I can’t unzip it all the way or else my zipper gets lost between the layers.
 I made a muslin and graded from a 42 out to a 44 in the bodice pieces, but since the bodice pieces only go right below my bust, it was pretty roomy, so I made a size 42 in the bodice and sleeves, and graded from a 42 to a 44 in the waistband. So if you need to grade out at the waist, do it in the waistband.
The only sewing tall alteration I made was to lower the bust by 1″ and add 1″ to the sleeves. On my muslin, I added 2″ (like I did for my Charleston), but that made the bust way too low. So 1″ was perfect for me! I added 2 inches to the skirt panels, but ended up cutting them off again at the end because the skirt is actually pretty long already.
 This fabric is a rayon poplin from Blackbird Fabrics, and it worked really well for this dress. If you are wondering what rayon poplin is (like I was when I ordered it), it’s basically a high quality rayon challis. It’s much easier to work with since it’s a little more substantial than low quality rayon challis, but it has a similar feel and drape. I really love it and plan on ordering rayon poplin instead of rayon challis in the future. (I did learn that Cotton+Steel fabrics are printed on rayon poplin, which makes so much sense because my Cotton+Steel fabric for my Cleo Skirt was really easy to work with.)
I purposely eliminated the side slit (plenty of room in the skirt without it), and made it a little shorter than floor length so that I can wear it with sandals or sneakers (for this kind of look). I am so excited to have this gorgeous dress to wear, and not have it just sit in my closet waiting to be taken to the fancy parties I never get invited to. 😉
Which version of the dress would you make? Would you do the elastic long sleeves or the flutter sleeve? (It was hard for me to choose!)
 Pattern was given to me by Deer and Doe in exchange for a pattern review. All thoughts and opinions are my own.
Long sleeve for sure! But it’s also been in the forties a couple days this week and flutter anything just makes me think about drafts. Your Magnolia is beautiful, and the fabric is dramatic, and yet it still looks like a dress you could wear to a friend’s house! You really split the difference perfectly!
Thank you, Lia! I haven’t tried flutter sleeves before, but they’re not really me, so I love these long sleeves. And I love that about the fabric too!
Do you think this pattern would work with a velvet jersey? I see it calls for woven… I just have a fabric in mind that would be so lovely in that design!
That sounds so pretty! If it’s a jersey you are using, I would size down 1 or 2 sizes and make sure you stabilize the neckline with some clear elastic or something. Maybe baste the pieces together (with a zigzag stitch) before sewing them permanently in case you decide you want a tighter or looser fit. I hope that helps!
Thank you! Still a noob, so all input helps!!
You’ve made it beautifully and your descriptions are really helpful. Could you say a bit more about the binding? Did though make bias tape from your fabric? You can’t see it! I don’t want to have an obvious binding o. The front bodice. If the bodice is self lined is the binding necessary do you think?
Thanks!
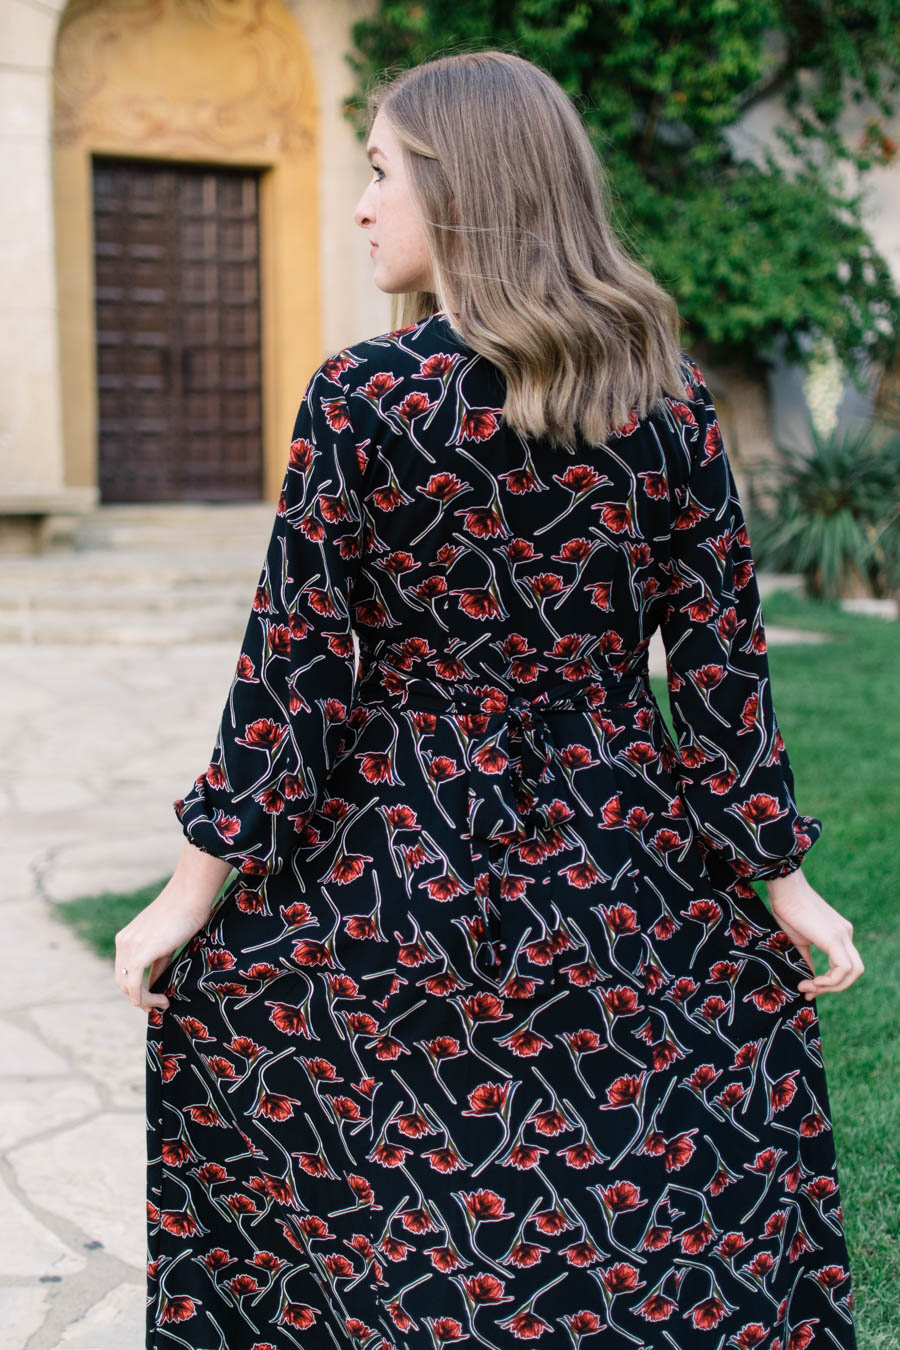
Hi Pennie! For my dress the bodice neckline does have a self binding that I made myself with the fabric. It is a pattern piece included with the pattern and instructions. They also have instructions on how to line it! So if you choose to line the bodice, then a binding usually isn’t necessary. And my fabric just hides the stitching really well. If you go to my Instagram, I have a flatlay and you can see the binding on the back of the neckline. Here is the link right to the picture. 🙂
https://www.instagram.com/p/BowWyDPhqng/
Many Thanks for your message, thats very helpful. I’m not sure if they have updated the pattern but there’s no pattern piece for the binding and only lining for the front bodice on version A, but perhaps that is sufficient. I hadnt realised it’s a blind bias binding so, I’m not so worried about that now. Am making and remaking toiles at the moment! 🙂
I actually just checked and it’s in the “supplies” section — it says 60 inches of bias tape. So I just opted to make my own, but I’m sorry to misguide you with saying there was a pattern piece! There are only facings for the front bodice pieces, but it shouldn’t be too hard to just cut a second back piece for the lining, if you need it. I hope your toile goes well! I toiled before making mine too to see if I needed to lower the bust at all and I was very glad I did (since I almost never do!).
It’s quite confusing to line the bodice! I’ve been Googling for about an hour to see how people have lined their Magnolia bodice but no one has detailed the process.
I’ve seen people sew the bodice, and then sew the bodice to the waist band. They have then repeated this process for the lining. So far, so good. Then, right sides together, they sew the bodice to the lining. That’s awesome in theory. But! The bodice is a wrap style already attached to the waist piece. How are they sewing the v part of the lining to the bodice because wouldn’t the waist piece get in the way? It seems like it would be a bit fiddly at best and the wrong method of sewing the lining at worst. I just can’t get my head around how they are sewing the centre front of the lining to the bodice given that waist band.
I’ve gone mad trying to work this out. I think I’ll buy a different pattern.
I wanted to write this comment in case anyone else has been confused with this so they know they are not alone!
Also oh my gosh I love you dress and I had to tell you that too!
It does seem like it might be a difficult pattern to line. My fabric was opaque enough that I just used bias tape like they instruct in the pattern. I don’t remember it being very hard to sew together. I hope you’re able to find a way to make it work!
I love this dress! Hoping to make one for a wedding I am going to! Really helpful tips! I am thinking doing the neckline like yours but maybe the short sleeve.
Is your height in your torso? I am 5ft7 but mainly have my height in my top so wondering about adding an inch! Sounds like doing a toile is essential x
Thank you, Cara! This dress is absolutely perfect for a wedding, and the short sleeve would be beautiful! I’m 5’11, and my height is distributed pretty evenly. I ended up doing a toile for the top bodice pieces before I cut the actual fabric and it was SUPER easy. (This coming from someone who hates doing a toile.) Toile fabric at Joann’s is like 1.99 a yard and sometimes it’s SUPER wide, so it’s definitely worth getting some for projects like this. To estimate how much length to add to the bodice, I just draped the pattern piece up to me and guessed how much to add before making the toile. I might have made a tiny adjustment after that, but the toile was really the key to getting the final project perfect. Good luck and I hope it turns out just the way you want it!
Hello Tori, thanks for sharing pictures and helpful tips. I bought the Magnolia today and I’m planning to make a maxi dress with long sleeves and bodice B which is the modest one. I got rayon challis and I know it’s going to be hard to work with ( I will be looking for rayon poplin like you suggested for my next one). I read the tutorial and couldn’t find what is the final measure for the long sleeves. I’m pretty short compared to you ( I’m only 5’3″) and only need to adjust the length of the skirt since my torso is very standard with the pattern.
I don’t really want to make a muslin for the sleeves also. I will be making one for the bodice since I probably need a FBA ( I’m pretty blessed in that department).
Anyways, Thanks in advance for any advise you could give me. Your Magnolia is very pretty.